Saturday, September 24, 2011

// // Leave a Comment

Move and copy files using SSH

Often you will need to move one or more files/folders or copy them to a different location. You can do so easily using an SSH connection. The commands which you would need to use are mv (short from move) and cp (short from copy).
The mv command syntax looks like this:
mv configuration.php-dist configuration.php
By issuing the above command we will move (rename) the file configuration.php-dist to configuration.php. 
You can also use mv to move a whole directory and its content:
mv includes/* ./
This will move all files (and folders) in the includes/ directory to the current working directory.
In some cases however, we will need to only update the files and move only files that were changed, which we can do by passing ‘-u’ as argument to the command:
mv -u includes/* admin/includes
The copy (cp) command works the same way as mv, but instead of moving the files/folders it copies them. For example:
cp configuration.php-dist configuration.php
The command will copy the configuration.php-dist file to configuration.php and will preserve the original file (the file will NOT be removed after it is copied).
cp also accepts various arguments:
cp -R includes/ includes_backup/
-R instructs cp to copy files recursively (for example, a whole directory). To overwrite already existing files you should use the -f argument:
cp -Rf includes/ admin/includes/

A more convenient way to copy files/folders is to use a 3rd party application, such as Midnight Commander. All our servers have mc (midnight commander) installed and it is available by executing the appropriate (mc) command using the command prompt.  Once inside the application you will see two sections - left and right. You can easily copy/move files from the left side directory to the right side using a semi-visual approach. You can even use your mouse to select files and function keys to execute commands.
You can see a picture of it below:
Midnight commander


 As you can see on the screenshot, there are numbers from 1 to 10 at the bottom of the console screen. These represents shortcuts to certain commands and are activated using the corresponding function key (i.e F1 for help, F5 to copy, etc).
Read More
// // Leave a Comment

How To Recover root password under linux with single user mode

It happens sometime that you can't remember root password. On Linux, recovering root password can be done by booting Linux under a specific mode: single user mode.
This tutorial will show how to boot Linux in single user mode when using GRUB and finally how to change root password.
During normal usage, a Linux OS runs under runlevels between 2 and 5 which corresponds to various multi-user modes. Booting Linux under runlevel 1 will allow one to enter into a specific mode, single user mode. Under such a level, you directly get a root prompt. From there, changing root password is a piece of cake.

1. Entering runlevel 1

Some Linux distribution, such as Ubuntu for instance, offer a specific boot menu entry where it is stated "Recovery Mode" or "Single-User Mode". If this is your case, selecting this menu entry will boot your machine into single user mode, you can carry on with the next part. If not, you might want to read this part.
Using GRUB, you can manually edit the proposed menu entry at boot time. To do so, when GRUB is presenting the menu list (you might need to press ESC first), follow those instructions:
  • use the arrows to select the boot entry you want to modify.
  • press e to edit the entry
  • use the arrows to go to kernel line
  • press e to edit this entry
  • at the end of the line add the word single
  • press ESC to go back to the parent menu
  • press b to boot this kernel
The kernel should be booting as usual (except for the graphical splash screen you might be used to), and you will finally get a root prompt (sh#).
Here we are, we have gained root access to the filesystem, let's finally change the password.

2. Changing root password

As root, changing password does not ask for your old password, therefore running the command:
# passwd
will prompt you for your new password and will ask you to confirm it to make sure there is no typo.
That's it, you can now reboot your box and gain root access again
Read More
// // Leave a Comment

How to edit a file via ssh

To edit a file via ssh we have the following editors: 

  • nano / pico
  • vim
  • vi
  • touch


Suppose we want to edit a file /home/w3tools/index.html using vim editor.


To edit this file use the following steps:


        1. Log in to server via ssh using any client (recommended: Putty)


        2. Run the following commands.
vim /home/w3tools/index.html
        3. Now the file index.html will be opened. To edit the file press i. Now make changes in the file.
     
        4. To save the file Press Esc then wq .


Your file will be updated successfully.
If index.html doesn't  exist it will be created automatically.


Note: To exit file editor without saving the file press Esc then q.


Read More
// // Leave a Comment

How to change root password via ssh.

To change the root password via ssh, use the following steps:

1. Log in to ssh by using any client(recommended: Putty).

2. Run these commands after it
su - root
passwd
3. Enter your new password for root. Confirm your password by re-entering it.

DONE...!! YOUR PASSWORD FOR ROOT IS NOW UPDATED.

Read More
// // Leave a Comment

PHP - lame encoder mp3 conversion

Uses PHP - lame to change ID3 tags and convert bitrate of a mp3 file.

You can change album,artist,trackno,genre,year,comment,artist,art and bitrate.


Link to lame encoder : Click here

Enjoy guys !


Source: TechnosLab
Read More
// // Leave a Comment

How to add tags/labels to bloggers posts via Gdata api

Read More
// // Leave a Comment

HTTP authentication via PHP

Here's a small snippet that let's you implement htaccess style http authentication in your PHP scripts. Just define user and password and you are ready to go !


Go Here To download the code: http://pastebin.com/9Xu02jLD

Make sure that this code block is present in topmost of your scripts or it'll give errors and authentication will be messed up.
Read More
// // Leave a Comment

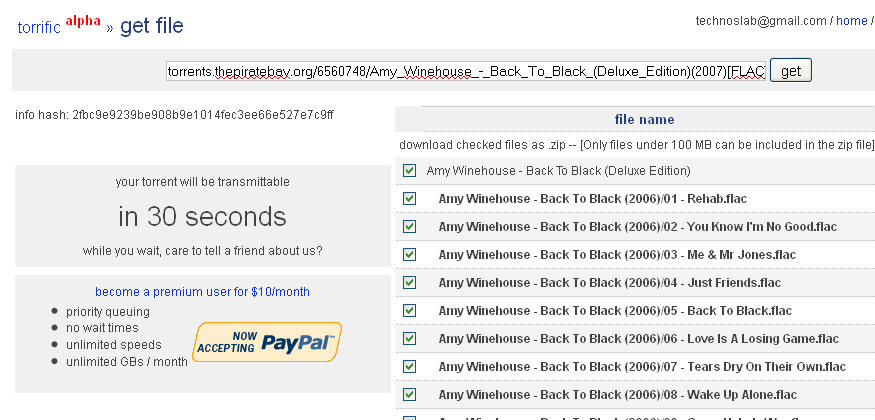
Bypass torrific.com download timer


Torrific.com is a great tool for fetching torrents and downloading them over http through our favorite download manager. From last week, they have imposed a timer on download page that limits us from downloading a fetched torrent instantly. Now we can either pay them to gain premium access to their services or we can find a work around. While I suggest you to go for premium membership, I also give you a work around.

On the page where you are asked to wait for the download to begin, just put this in the browser's address bar and hit enter.

javascript:alert(DELAY_TIME=0);

and you would get the download link(s) immediately. Please note that Google chrome doesn't support javascript execution in address bar so it would not work for chrome users. 
Source: TechnosLab
Read More
// // Leave a Comment

How to Change The Default SSH Port.

To force or change the default SSH to run on a non standard port, use the following steps: 

1. Open /etc/ssh/sshd_config in your favorite text editor:


2. Look for the below lines: 


# Port 22

3. Uncomment and edit this line to change the default port.
For example you can set it to:


Port 99

4. Save the file, and restart the SSH.


/etc/init.d/ssh restart

NOTE: Removing the # will uncomment and you will need to remove this for any change in the port.
Read More
// // Leave a Comment

How to force remove a dead node from solusvm.

This command will help you in removing a dead node from solusvm master. Since the node is dead therefore we cannot remove it using the available option in the master.
Login to SSH in the master server and run below command.


php /usr/local/solusvm/scripts/deletenode.php --level=force --comm=delete --id=

The node id can be found in the VPS Control Panel. Click on node list and note down the ID of the node you want to remove.

Example: Suppose you want to remove a node having ID = 5

Then the command will be like:

php /usr/local/solusvm/scripts/deletenode.php --level=force --comm=delete --id=5

Similarly you can force remove any node from the solusVM master. This will only remove the NODE from master and will not remove any physical VPS inside that node.
Read More