
Simple Post Scanner in PHP.
Wednesday, December 21, 2011
In
anti ddos,
DDOS,
PHP,
PHP Tutorials
//
//
5 comments
Anti-DDoS PHP Script
Create a directory anti_ddos and throw all the scripts there:
index.php (DDOS attacks detection module):
index.php (DDOS attacks detection module):
anti_ddos.php (module redemption DDOS attacks):
PHP Code:
Also, for the script will need 4 files check.txt, white_ip.txt, black_ip.txt all_ip.txt and create them in the same directory and all the rights set 666 (read and write).
It is also desirable during the attack lists of IP addresses the attackers machine, the file transfer black_ip.txt gradually. Htaccess file and block them out, then the load is still considerably lower.
Example of a file. Htaccess
Code:
Deny from 11.11.11.11 22.22.22.22 etc. through gap
To connect the script at the beginning of each file, which can be subjected to attack, add the line:
PHPCode:
require ("anti_ddos/index.php");
Saturday, October 8, 2011
In
cache,
fast,
mysql,
performance,
PHP,
query
//
//
Leave a Comment
Speeding up MySQL Queries for faster performance using MySQL Cache
MySQL Queries Can Really Kill Your Web Server. Yes its true that writing buggy SQL queries can result in a lot of server cpu usage. Many webmasters face this problem and they think that their service provider is not good and blah blah.
Best Example is of wapsites using sea 8.1 Script.
if you are in one of them or your server is getting overloaded because of MySQL then i will suggest you to look at below method of caching can help in reducing the cpu usage of a script.
ok so below is the way on how to use SQL cache.
Suppose your have a query
SELECT name from users where name='xtra';
so query with cache will be like this:
SELECT SQL_CACHE name from users where name='xtra';
This Will stores the result in cache.
Using This Can reduce Your Memory Requirement and load Your Site Faster
Similarly there are a lot of ways to improve and reduce the server load by optimizing the SQL queries.
In
cpanel,
nameservers,
parked domain
//
//
Leave a Comment
Cpanel Error from park wrapper: Using nameservers with the following IPs
When i tried add a domain into cpanel addon it shows
Error from park wrapper: Using nameservers with the following IPs:, Sorry, the domain is already pointed to an IP address that does not appear to use DNS servers
associated with this server. Please transfer the domain to this servers nameservers or have your administrator add one of its nameservers to /etc/ip.remotedns and make the proper A entries on that remote nameserver.
It's mean, My domain ex: testing.com is not using the cpanel/whm DNS or nameservers.
This can be solved by :
1. change a nameservers in your domain registrar to pointing it to your CPANEL/WHM DNS servers
2. tweak your WHM to support external nameservers.
Login into your WHM with root access.
Server Configuration > Tweak Settings
Within this page you get a lot of options, the one I had to enable (tick) was:
Allow Creation of Parked/Addon Domains that resolve to other servers (i.e. domain transfers) This can be a major security problem. If you must have it enabled, be sure to not allow users to park common internet domains.
Basically it allows cPanel to Add domains on to external nameservers.
After you have added your add on into your CPANEL.
You need to un tick the allow creation of parked/addon domains that resolve to other servers again.
this will prevent any major security problem.
Error from park wrapper: Using nameservers with the following IPs:
associated with this server. Please transfer the domain to this servers nameservers or have your administrator add one of its nameservers to /etc/ip.remotedns and make the proper A entries on that remote nameserver.
It's mean, My domain ex: testing.com is not using the cpanel/whm DNS or nameservers.
This can be solved by :
1. change a nameservers in your domain registrar to pointing it to your CPANEL/WHM DNS servers
2. tweak your WHM to support external nameservers.
Login into your WHM with root access.
Server Configuration > Tweak Settings
Within this page you get a lot of options, the one I had to enable (tick) was:
Allow Creation of Parked/Addon Domains that resolve to other servers (i.e. domain transfers) This can be a major security problem. If you must have it enabled, be sure to not allow users to park common internet domains.
Basically it allows cPanel to Add domains on to external nameservers.
After you have added your add on into your CPANEL.
You need to un tick the allow creation of parked/addon domains that resolve to other servers again.
this will prevent any major security problem.
In
BASH,
CentOS | Fedora,
Debian,
FreeBSD,
HP-UX,
Kubuntu,
Linux Servers,
Linux Tutorials,
OpenBSD,
OpenSUSE,
RHEL,
Slackware,
ssh,
Trustix,
Ubuntu,
Unix Servers,
Unix Tutorials
//
//
Leave a Comment
Using Screen for Linux Session Management
What is Screen ?
GNU Screen can be thought of as a text version of graphical window managers, or as a way of putting virtual terminals into any login session. It is a wrapper that allows multiple text programs to run at the same time, and provides features that allow the user to use the programs within a single interface productively.
Persistence
Similar to VNC, GNU Screen allows the user to start applications from one computer, and then reconnect from a different computer and continue using the same application without having to restart it. This makes migration between locations like work and home simple. Screen provides terminal-agnostic functionality so that users can disconnect and reconnect using different terminal types, allowing applications to continue running without being aware of the change in terminals.
Multiple windows
Multiple terminal sessions can be created, each of which usually runs a single application. The windows are numbered, and the user can use the keyboard to switch between them. Some GUI terminal emulators provide tabs or otherwise similar functionality to this. Each window has its own scroll-back buffer, so that output is captured even when the window isn't actively displayed, and that history can be saved even when migrating to another computer. Windows can be split-screened. While some text applications have this functionality built in, Screen allows any application to be split-screened alongside any number of other applications.
Session Sharing
Screen allows multiple computers to connect to the same session at once, allowing collaboration between multiple users. The same computer can also be used to make multiple simultaneous connections, providing alternative functionality to screen-splitting, particularly for computers with multiple monitors.
Why we need Screen ?
Here is an example You are logged into your remote server via SSH and happily plucking along at your keyboard and then it happens. Suddenly, the characters stop moving and then you get the dreaded “Connection Closed” message. You have just lost your session. You were halfway through some task and now you have to start over. Ugh. Well you can prevent this from happening by using screen. The Linux screen tool can not only save you from disconnection disasters, but it also can increase your productivity by using multiple windows within one SSH session.
Installing Screen
Most linux are already have screen installed on the system.
if you can find any screen installed on the system. you can install it from yum, apt-get or other repositories
Example installing screen in centos/RHEL
#yum install screen
Example installing screen in BSD / FREEBSD
#cd /usr/ports/sysutils/screen
#make install clean
Screen usually installed in /usr/bin/screen or /usr/local/bin/screen
Using Screen
Simply type screen in your shell prompt like below
#screen
You will see a screen welcome message like below
you can simply press space to continue

How To Using Screen
We need to press CTRL and then press "A" to send a command to screen.
You can reconfigure these keys to your liking using a .screenrc file, but I just use the defaults
Multiple Windows or Multiple Screen Session
#screen
(now we are in screen 0:bash)
Example in screen 0 we will download kernel
#cd /root

(We can open other session with command below)
Press CTRL and A and c
(Now we are in a screen 1 session and then you can see a new SSH prompt again like below)
#
We can exit the screen 1 session, simply type command below :
#exit
And you will back to a screen 0 session above where the wget kernel still running.
We also can detached a session with command below :
(still in a screen 0 session )
Press CTRL and press A and press d
[detached]
#
You will see a detached, which is mean screen 0 session still running in background and we already quit from screen session. but we don't need to worry about ssh lost connection because we can attach to screen again.
How can we attached to a screen 0 ?
First we need to see a screen session list with command below
#screen -ls
There is a screen on:
26303.pts-3.sitenow (Detached)
1 Socket in /var/run/screen/S-root.
Now we can see a screen 26303.pts-3.sitenow (Detached)
we will attach this 26303.pts-3.sitenow screen session
#screen -r 26303.pts-3.sitenow
(now we are in screen 0 session again )
How about if i have few screen session and i want to back to previous screen without exit the current screen ?
in screen we can press CTRL and A and p for back to previous session screen or
in screen we can press CTRL and A and n for next session screen
For complete reference.
Please take a look screen User's Manual http://www.gnu.org/software/screen/manual/screen.html
GNU Screen can be thought of as a text version of graphical window managers, or as a way of putting virtual terminals into any login session. It is a wrapper that allows multiple text programs to run at the same time, and provides features that allow the user to use the programs within a single interface productively.
Persistence
Similar to VNC, GNU Screen allows the user to start applications from one computer, and then reconnect from a different computer and continue using the same application without having to restart it. This makes migration between locations like work and home simple. Screen provides terminal-agnostic functionality so that users can disconnect and reconnect using different terminal types, allowing applications to continue running without being aware of the change in terminals.
Multiple windows
Multiple terminal sessions can be created, each of which usually runs a single application. The windows are numbered, and the user can use the keyboard to switch between them. Some GUI terminal emulators provide tabs or otherwise similar functionality to this. Each window has its own scroll-back buffer, so that output is captured even when the window isn't actively displayed, and that history can be saved even when migrating to another computer. Windows can be split-screened. While some text applications have this functionality built in, Screen allows any application to be split-screened alongside any number of other applications.
Session Sharing
Screen allows multiple computers to connect to the same session at once, allowing collaboration between multiple users. The same computer can also be used to make multiple simultaneous connections, providing alternative functionality to screen-splitting, particularly for computers with multiple monitors.
Why we need Screen ?
Here is an example You are logged into your remote server via SSH and happily plucking along at your keyboard and then it happens. Suddenly, the characters stop moving and then you get the dreaded “Connection Closed” message. You have just lost your session. You were halfway through some task and now you have to start over. Ugh. Well you can prevent this from happening by using screen. The Linux screen tool can not only save you from disconnection disasters, but it also can increase your productivity by using multiple windows within one SSH session.
Installing Screen
Most linux are already have screen installed on the system.
if you can find any screen installed on the system. you can install it from yum, apt-get or other repositories
Example installing screen in centos/RHEL
#yum install screen
Example installing screen in BSD / FREEBSD
#cd /usr/ports/sysutils/screen
#make install clean
Screen usually installed in /usr/bin/screen or /usr/local/bin/screen
Using Screen
Simply type screen in your shell prompt like below
#screen
You will see a screen welcome message like below
you can simply press space to continue
How To Using Screen
We need to press CTRL and then press "A" to send a command to screen.
You can reconfigure these keys to your liking using a .screenrc file, but I just use the defaults
Multiple Windows or Multiple Screen Session
#screen
(now we are in screen 0:bash)
Example in screen 0 we will download kernel
#cd /root
(We can open other session with command below)
Press CTRL and A and c
(Now we are in a screen 1 session and then you can see a new SSH prompt again like below)
#
We can exit the screen 1 session, simply type command below :
#exit
And you will back to a screen 0 session above where the wget kernel still running.
We also can detached a session with command below :
(still in a screen 0 session )
Press CTRL and press A and press d
[detached]
#
You will see a detached, which is mean screen 0 session still running in background and we already quit from screen session. but we don't need to worry about ssh lost connection because we can attach to screen again.
How can we attached to a screen 0 ?
First we need to see a screen session list with command below
#screen -ls
There is a screen on:
26303.pts-3.sitenow (Detached)
1 Socket in /var/run/screen/S-root.
Now we can see a screen 26303.pts-3.sitenow (Detached)
we will attach this 26303.pts-3.sitenow screen session
#screen -r 26303.pts-3.sitenow
(now we are in screen 0 session again )
How about if i have few screen session and i want to back to previous screen without exit the current screen ?
in screen we can press CTRL and A and p for back to previous session screen or
in screen we can press CTRL and A and n for next session screen
For complete reference.
Please take a look screen User's Manual http://www.gnu.org/software/screen/manual/screen.html
In
CentOS | Fedora,
Debian,
FreeBSD,
HP-UX,
Kubuntu,
Linux Servers,
Linux Tutorials,
OpenBSD,
OpenSUSE,
RHEL,
Slackware,
ssh,
Trustix,
Ubuntu,
Unix Servers,
Unix Tutorials,
Wget
//
//
Leave a Comment
How To Using Wget to Download All Files and Directory
This is a short tutorial to download all files and directory.
Example :
i have a files and directory in remote server and want to transfer all files and directory to local client.
here is a simple command to download it using wget instead of ftp.
#wget -r ftp://username:password@domain.com/
From the command above it will download everything in / directory of domain.com into your computer / local client.
OpenVZ web interface with WebVZ
What is WebVZ ?
WebVZ is a light web based control panel (~ 300KB) for OpenVZ. It is a free and open source under GPL GNU licence. WebVZ has its own webserver and databases engine which means there is almost no configurations needed.
WebVZ lets you manage the containers from the web browser which makes the life of the system administartors much easier than using the command line tools.
WebVZ Features
1. Create containers.
2. Start, Stop, Restart, and Destroy containers.
3. Migrate containers from Host Node to another Host Node.
4. Create and Manage configuration files.
5. Change the configuration of the containers on the fly.
6. Start, Stop, and Restart OpenVZ service.
7. Execute Commands inside the running containers and display the output on the same page.
8. list the stopped containers, the running containers and/or all of them.
9. Assign a name for each container.
10. User Accesss Module.
11. Add/delete multiple IP Addresses
12. Monitor container's resources (user_beancounter) and highlight the over used resource.
13. Assign root password.
13. Enable/Disable booting of the container.
14. Manage Operating System Templates (delete, download and copy).
15. Recreate a customized OS-Template from an existing container.
16. Copy OS-Template from a machine to another.
17. Backup all containers .
18. Backup all client's containers .
19. Backup a specific container .
20. restore containers .
21. Access Control Level .
22. Client can stop, start and restart his/her container.
23. Client can run commands, observe, and monitor the containers .
24. Ownership of containers .
25. admin and client users .
26. Security enforcement on who access what.
27. and many more.
WebVZ Requirements before installation
WebVZ needs Ruby on Rails & sqlite3-ruby to be installed on the server.
Installing Sqlite3-Ruby
I can't install sqlite3-ruby with gem install sqlite3-ruby
so i just install it from yum repository
#yum install ruby-devel sqlite sqlite-devel ruby-rdoc
Installing WebVZ
#cd /root
#wget http://download.github.com/shuaibzahda-webvz-c6586ca.tar.gz
#tar -zxvf shuaibzahda-webvz-c6586ca.tar.gz
#ruby /root/webvz/script/server -d
Added Ruby WebVZ webserver to rc.local
#vi /etc/rc.local
#### add this line below ####
ruby /root/webvz/script/server -d
Open WebVZ from Web Browser
Click Internet Explorere or Mozilla Firefox
Input your server ip address example http://10.10.10.10
Input username : admin
Input password : admin123
After you install and login to WebVZ. It is advised to create a new user and delete the admin user.
Tuesday, October 4, 2011
In
captcha,
PHP,
security
//
//
Leave a Comment
Captcha image verification
A good way to avoid automatic form submissions when creating a web form is to add some kind of verification. One of the best ways is to use an image verification, called also captcha. What it does is to dynamically create an image with a random string displayed on it. Then visitor is asked to type that string in a text field and once the form is submitted it checks if the string on the image matches the one inputted by the user. Because there is no easy way to read a text from an image (image recognition) this is a good way to protect your web forms from spammers.
For doing this CAPTCHA I would suggest using a session variable where you store the string generated and displayed on that dynamically generated image.
Next we need to create our web form.
All we have to do now is to make the submit.php script which will check if the verification code you enter matches the one that has been randomly generated.
For doing this CAPTCHA I would suggest using a session variable where you store the string generated and displayed on that dynamically generated image.
<?php
session_start();
$text = rand(10000,99999);
$_SESSION["vercode"] = $text;
$height = 25;
$width = 65;

$image_p = imagecreate($width, $height);
$black = imagecolorallocate($image_p, 0, 0, 0);
$white = imagecolorallocate($image_p, 255, 255, 255);
$font_size = 14;

imagestring($image_p, $font_size, 5, 5, $text, $white);
imagejpeg($image_p, null, 80);
?>
Save this code in a file called captcha.php. What this script does is to generate a random number from 10000 to 99999 and then assign it to $_SESSION['vercode']. Then it generates a 25x65 pixels image with black background and white text using size 14. So if you upload that captcha.php file on your web site and open http://www.site.com/captcha.php you will see an image displaying random integer. You will receive a new random integer every time you refresh that page. Next we need to create our web form.
<form action="submit.php" method="post">
Comment: <textarea name="coment">textarea><br>
Enter Code <img src="captcha.php"><input type="text" name="vercode" /><br>
<input type="submit" name="Submit" value="Submit" />
form>
Above code will create a form with a single textarea box, randomly generated image using the captcha.php script and a text field where you will have to enter the verification code.
All we have to do now is to make the submit.php script which will check if the verification code you enter matches the one that has been randomly generated.
<?php
session_start();
if ($_POST["vercode"] != $_SESSION["vercode"] OR $_SESSION["vercode"]=='')  {
     echo  'Incorrect verification code.
';
} else {
     // add form data processing code here
     echo  'Verification successful.
';
};
?>
Sunday, October 2, 2011
In
class,
pascal,
PHP
//
//
Leave a Comment
Pascal PHP Class
| Name: | Pascal |
|---|---|
| Base name: | pascal |
| Description: | Generate the triangle of Pascal with given rows |
| Version: | 1.0 |
| Required PHP version: | 3.0 |
| License: | Freeware |
Friday, September 30, 2011
In
dbORM,
PHP
//
//
Leave a Comment
dbORM - Generate classes to access MySQL tables as objects
| Name: | dbORM |
|---|---|
| Base name: | dborm |
| Description: | Generate classes to access MySQL tables as objects |
| Version: | - |
| Required PHP version: | 5 |
| License: | GNU General Public License (GPL) |
Download The File From Here: http://down-w3tools.elementfx.com/dborm(w3tools.info).zip
Thursday, September 29, 2011
In
cache,
PHP,
scache
//
//
Leave a Comment
SCache simple data caching class
| Name: | SCache simple data caching class |
|---|---|
| Base name: | scache |
| Description: | Cache content data strings in files |
| Version: | 1.2 |
| Required PHP version: | 5.0 |
| License: | GNU General Public License (GPL) |
Wednesday, September 28, 2011
In
PHP,
validator,
w3c
//
//
Leave a Comment
W3c Validator
| Name: | my_validator |
|---|---|
| Base name: | my_validator |
| Description | Validate HTML pages with the W3C service |
| Version: | - |
| Required PHP version: | 5.0 |
| License: | Proprietary License with Source |
In
handyman,
PHP
//
//
Leave a Comment
PHP Handyman
| Name: | PHP Handyman |
|---|---|
| Base name: | php-handyman |
| Description: | Dynamically add functions to an object |
| Version: | 0.3 |
| Required PHP version: | 5.0 |
| License: | GNU General Public License (GPL) |
Tuesday, September 27, 2011
In
facebook,
fb,
timeline,
update
//
//
Leave a Comment
How To Enable Facebook Timeline Feature Easily
Hi Guys . As you all know that facebook has launched its new feature FACEBOOK TIME LINE which has been discussed in previous post.. so here i will tell all of you that how can u enable that feature easily on facebook step by step
 During the f8 conference 2 days before, Mark Zuckerberg and his team announced a new feature called the Timeline - which is a visual representation of your life and the events surrounding it.
The feature is something totally new and wonderful, and in a unique way expresses a person’s identity. The feature is currently in beta and can beaccessedby developers only. This article shows how you can enable Timeline for your Facebook account.
Before I tell how you can enable the Facebook Timeline, let me explain you the various sections it has. The topmost portion of the timeline has a large space for a lead photo, which allows you to add an image to make your page look attractive. At the bottom-left it has your standard default overlapping display picture.
The next portion is called the Cover, which basically has your personal information, friends’ list, photos, “likes”, votes and so on. The next section serves as a dock for all youractivities(stories) you do on Facebook. Here the section is split into two columns which are presented with all the activities chronologically. It also contains the “Recent Activity” section and also a box to update your current status.
Enable Facebook Timeline
#1 To enable Facebook Timeline, the first step you need to do is to activate the Developer status for your account. To do this, login to your Facebook account and type “developer” into the Facebook search bar. Click on the first result, and add the app (Or click here to directly go to the app page).
#2 You will be asked to grant permissions for the app toaccess your basic information like name, profile picture, user ID and so on. Click on “Allow” and you will be taken to the Developer page. Click on the “Create New App” button. Provide a display name, appnamespace and click “Continue”.

#3 Now you will be taken to your app’s main settings page. On the left sidebar, click the “Open Graph” link. You have to enter theaction and object in order create a test action for your app, like “watch” a “movie” or “read” a book”.

#4 On the next screen, just scroll down to the bottom and click “Save Changes and Next”. It might take a couple of minutes to save, so be patient until it loads the next page. Continue this for the next two pages. When you finished with the saving process, you will land on a page something like this -

#5 Now go back to your Facebook home screen and you will notice an invite on top of the page to try the Timeline feature. Click on “Get it now” and you’re done.

In
facebook,
new,
update
//
//
Leave a Comment
Facebook Changes Again: Everything You Need To Know
As we predicted, Mark Zuckerberg’s keynote at the f8 conference in San Francisco Thursday introduced some of the most profound changes seen on Facebook since its inception. So many changes, in fact, that it can be hard to keep track. So here’s a handy-dandy guide.
1. You’re going to get a Timeline — a scrapbook of your life. In a complete overhaul of its ever-evolving profile page, Facebook is introducing Timeline. This is a stream of information about you — the photos you’ve posted, all your status updates, the apps you’ve used, even the places you’ve visited on a world map — that scrolls all the way back to your birth. It encourages you to post more stuff about your past, such as baby pictures, using Facebook as a scrapbook.
The further back in Timeline you go, the more Facebook will compress the information so that you’re only seeing the most interesting parts of your history. You can customize this by clicking on a star next to a status, say, or enlarging a picture.
Timeline is in beta now, and will be opt-in to start. In the long run, it will become the new default profile page.
2. You don’t have to just Like something — now you can [verb] any [noun]. Remember when all you could do to something on Facebook — a video, a comment, a product, a person — was Like it? Pretty soon that’s going to seem laughably antiquated. The social network has launched Facebook Gestures, which means that Facebook’s partners and developers can turn any verb into a button.
So you’ll start seeing the option to tell the world you’re Reading a particular book, for example, or Watching a given movie, or Listening to a certain tune. In turn, as many observers have pointed out, this is likely to lead to an explosion of oversharing — and far more information on your friends’ activities showing up in your news feed than you probably cared to know.
3. Facebook apps need only ask permission once to share stories on your behalf. Although not as big a deal as the Timeline, this tweak may be one of the more controversial. Previously, apps had to ask every time they shared information about you in your profile. Now, the first time you authorize the app, it will tell you what it’s going to share about you. If you’re cool with that, the app never has to ask you again.
But you don’t have to worry about this app stuff clogging your news feed, because …
4. All “lightweight” information is going to the Ticker. Status updates, photos from a wedding or a vacation, changes in relationship status: these are the kinds of things you want to see from your friends when you look at your news feed. Who killed whom in Mafia Wars? Who planted what in FarmVille? Not so much. So that kind of trivial detail has been banished to the Ticker, a real-time list of things your friends are posting now that scrolls down the side of your screen.
5. You can watch TV and movies, listen to music, and read news with your friends — all within Facebook. Starting today, thanks to a whole bunch of partnerships, there are a lot more things you can do without ever having to leave Facebook. You can watch a show on Hulu, listen to a song on Spotify, or check out a story on Yahoo News (or Mashable, via the Washington Post‘s Social Read app). The ticker will tell you what your friends are watching, listening to or reading, allowing you to share the experience with them by clicking on a link.
The upshot: a brand-new kind of media-based peer pressure. On stage, Netflix CEO Reed Hastings — a launch partner — revealed that he had only just decided to watch Breaking Bad because Facebook’s Ticker told him a colleague was watching it. Netflix’s own algorithm had been recommending the show to him for years, but that was never reason enough for Hastings.
6. Facebook has more users and more engagement than ever. We got two interesting nuggets of information out of Zuckerberg (and the Zuckerberg-impersonating Andy Samberg): Facebook has hit 800 million users, and most of them are active. The social network just saw a new record for the most visitors in one day: an eye-popping 500 million.
Indeed, the whole impression left by the event was that of a confident, fast-evolving company that is becoming ever more professional, and Zuckerberg’s stage show bore more than a little resemblance to an Apple keynote. It’s going to be interesting to see what Google+ can do to keep up.
Sunday, September 25, 2011
In
CEO,
facebook,
fb,
hack,
Mark Zuckerberg,
password
//
//
Leave a Comment
Facebook's New Timeline is A New Gift For Hackers
Hi Guys Here I am With a blasting news of facebook. According to Facebook CEO Mark Zuckerberg, Timeline is “the story of your life,” But According To me Facebook’s New Timeline Is A New Gift For Hackers
Facebook’s new Timeline will make it even easier for criminals and others to mine the social network for personal information they can use to launch malicious attacks and steal passwords, a researcher said today.
Timeline, which Facebook unveiled yesterday at a developer conference and plans to roll out to users in a few weeks, summarizes important past events in a one-page display.
According to Facebook CEO Mark Zuckerberg, Timeline is “the story of your life,”
That has experts at U.K.-based Sophos concerned.
“Timeline makes it a heck of a lot easier [for attackers] to collect information on people,” said Chet Wisniewski, a Sophos security researcher. “It’s not that the data isn’t already there on Facebook, but it’s currently not in an easy-to-use format.”
Cybercriminals often unearth personal details from social networking sites to craft targeted attacks, noted Wisniewski, and Timeline will make their job simpler.
“And Facebook encourages people to fill in the blanks [in the Timeline],” said Wisniewski, referring to the new tool’s prompting users to add details to sections that are blank.
Because people often use personal information to craft passwords or the security questions that some sites and services demand answered before passwords are changed, the more someone adds to Timeline, the more they put themselves at risk, said Wisniewski.
“Remember the hack of [former Alaska governor] Sarah Palin’s account?” asked Wisniewski. “That hacker found the answers to her security questions online.”
A former University of Tennessee student who bragged it took him just 45 minutes of research to reset Palin’s Yahoo Mail account password was convicted on multiple federal felony counts last year.
Hackers can also use what they find on Facebook and elsewhere to craft convincing emails that include malware or links to malicious sites, noted Wisniewski, even if the individual is not the target.
“It may be about the fact that you work for RSA [Security],” he said, referring to the emails sent to low-level employees at that firm earlier this year. Those emails, which included malware embedded in Excel spreadsheets, gave attackers a foothold on RSA’s network. The criminals then scoured RSA’s systems and stole confidential information about its popular SecurID authentication token technology.
Others, not strictly hackers, could use Timeline to quickly dig up dirt as well, said Wisniewski.
“Someone could use it to gather information to harass you, or someone at work competing for your job could use it,” he said.
“The more you put in there to make it complete — and we’ve been conditioned to finish forms — the easier it is for someone with ill intent to gather information about you,” said Wisniewski.
Database Connection With PHP
This tutorial will help you make connection to your database with PHP. It’s very simple process but I know how difficult can be for someone who is only starting to learn PHP. To test this example you should download and install Apache server, MySQL database server and PHP. You can find detailed guide and all mentioned components here.
Creating config.php
If you want to use a database in your application, you have to make config.php file which will contain basic database data. Here we will declare database path, username, password, database name and create connection string. We’ll make local database connection for a start. Put the code below into config.php file and put it in the root folder of your project.
<?php
$host = "localhost"; //database location
$user = "bitis"; //database username
$pass = "kaka"; //database password
$db_name = "bitis"; //database name
//database connection
$link = mysql_connect($host, $user, $pass);
mysql_select_db($db_name);//sets encoding to utf8
mysql_query("SET NAMES utf8");
?>
First 4 lines are basic database data. 2 lines below is connection string which connects to server and then mysql_select_db selects database. The last line is optional but I like to include it to be sure the data will be in utf8 format. Now we have config.php file created and saved in the root folder of our project.
Include config.php in application
Don’t be distracted with me calling website an application. I call it because you can use this methods in any application. It doesn’t necessarily has to be a website.
To include config.php into application (lets say it’s a website) simply put next line on the top of the source code of index.php.
<?php include 'config.php'; ?>
That’s it. You only need this code and you’ll have your first database driven application. Hope this tutorial helped you.
If you know a better way of doing this, post it in a comment.
Saturday, September 24, 2011
Searching for files/text using SSH
In some cases you would need to find the location of a given file or to search for a certain text in all files under a directory. SSH provides two different commands, which can be used to accomplish this.
In order to search for a file location you can use the find command. Find is a very powerful tool and accepts various arguments allowing you to specify the exact search term (i.e search by name, by type or even by modified time).
In order to search for a file location you can use the find command. Find is a very powerful tool and accepts various arguments allowing you to specify the exact search term (i.e search by name, by type or even by modified time).
For example, to search for a file called myFile.txt under the current folder (and all subfolders), you would need to use the following command:
find . -name myFile.txt
If you are uncertain about the file name or would like to match a part of the name, you can use a wildcard pattern:
find . -name “myFile*”
If you would like to list only directories and leave all files out of the result:
find . -type d
Or if you want to filter only files modified for the last 2 days, you would need to use:
find . -mtime -2
You can also search for a given text in the files content as well. The command you should be using in this case is ‘grep’ . Grep is a very powerful tool and accepts various command line arguments. For a full list it is recommended to check the manual pages by typing ‘man grep’.
You can also search for a given text in the files content as well. The command you should be using in this case is ‘grep’ . Grep is a very powerful tool and accepts various command line arguments. For a full list it is recommended to check the manual pages by typing ‘man grep’.
An example of using grep to find a certain text can be found below:
grep “database” configuration.php
The above command instructs grep to look for the string “database” in configuration.php file and display the containing line. If you don’t know which file contains the text, you can use:
grep -r -H “database” *
This will make grep look recursively (-r option) and provide the result in human readable format (-H option) for the string “database” in all (*) files under the current working directory.
To only list the file names containing the string you are searching but omit the line containing it, you can use the -l argument:
grep -l “database” *
This will display the filenames containing the word database, but will not actually list the line containing it.
Grep can also be used to filter the results from other commands. For example, the line below will only output configuration.php result:
ls -la | grep configuration.php
In some rare cases, you would not like to use find or grep. For example, to find a certain file in the whole server, it would be best to use an alternative command -- whereis or which:
whereis perl
or
which perl
The execution of the above commands will locate the perl binary and display the full path(s) to it.
In
copy,
files,
move,
ssh
//
//
Leave a Comment
Move and copy files using SSH
Often you will need to move one or more files/folders or copy them to a different location. You can do so easily using an SSH connection. The commands which you would need to use are mv (short from move) and cp (short from copy).
The mv command syntax looks like this:
mv configuration.php-dist configuration.php
By issuing the above command we will move (rename) the file configuration.php-dist to configuration.php.
You can also use mv to move a whole directory and its content:
mv includes/* ./
This will move all files (and folders) in the includes/ directory to the current working directory.
In some cases however, we will need to only update the files and move only files that were changed, which we can do by passing ‘-u’ as argument to the command:
mv -u includes/* admin/includes
The copy (cp) command works the same way as mv, but instead of moving the files/folders it copies them. For example:
cp configuration.php-dist configuration.php
The command will copy the configuration.php-dist file to configuration.php and will preserve the original file (the file will NOT be removed after it is copied).
cp also accepts various arguments:
cp -R includes/ includes_backup/
-R instructs cp to copy files recursively (for example, a whole directory). To overwrite already existing files you should use the -f argument:
cp -Rf includes/ admin/includes/
A more convenient way to copy files/folders is to use a 3rd party application, such as Midnight Commander. All our servers have mc (midnight commander) installed and it is available by executing the appropriate (mc) command using the command prompt. Once inside the application you will see two sections - left and right. You can easily copy/move files from the left side directory to the right side using a semi-visual approach. You can even use your mouse to select files and function keys to execute commands.
A more convenient way to copy files/folders is to use a 3rd party application, such as Midnight Commander. All our servers have mc (midnight commander) installed and it is available by executing the appropriate (mc) command using the command prompt. Once inside the application you will see two sections - left and right. You can easily copy/move files from the left side directory to the right side using a semi-visual approach. You can even use your mouse to select files and function keys to execute commands.
You can see a picture of it below:

As you can see on the screenshot, there are numbers from 1 to 10 at the bottom of the console screen. These represents shortcuts to certain commands and are activated using the corresponding function key (i.e F1 for help, F5 to copy, etc).
In
linux,
password,
recover,
root,
single user,
ssh
//
//
Leave a Comment
How To Recover root password under linux with single user mode
It happens sometime that you can't remember root password. On Linux, recovering root password can be done by booting Linux under a specific mode: single user mode.
This tutorial will show how to boot Linux in single user mode when using GRUB and finally how to change root password.
During normal usage, a Linux OS runs under runlevels between 2 and 5 which corresponds to various multi-user modes. Booting Linux under runlevel 1 will allow one to enter into a specific mode, single user mode. Under such a level, you directly get a root prompt. From there, changing root password is a piece of cake.
Using GRUB, you can manually edit the proposed menu entry at boot time. To do so, when GRUB is presenting the menu list (you might need to press ESC first), follow those instructions:
Here we are, we have gained root access to the filesystem, let's finally change the password.
That's it, you can now reboot your box and gain root access again
This tutorial will show how to boot Linux in single user mode when using GRUB and finally how to change root password.
During normal usage, a Linux OS runs under runlevels between 2 and 5 which corresponds to various multi-user modes. Booting Linux under runlevel 1 will allow one to enter into a specific mode, single user mode. Under such a level, you directly get a root prompt. From there, changing root password is a piece of cake.
1. Entering runlevel 1
Some Linux distribution, such as Ubuntu for instance, offer a specific boot menu entry where it is stated "Recovery Mode" or "Single-User Mode". If this is your case, selecting this menu entry will boot your machine into single user mode, you can carry on with the next part. If not, you might want to read this part.Using GRUB, you can manually edit the proposed menu entry at boot time. To do so, when GRUB is presenting the menu list (you might need to press ESC first), follow those instructions:
- use the arrows to select the boot entry you want to modify.
- press e to edit the entry
- use the arrows to go to kernel line
- press e to edit this entry
- at the end of the line add the word single
- press ESC to go back to the parent menu
- press b to boot this kernel
Here we are, we have gained root access to the filesystem, let's finally change the password.
2. Changing root password
As root, changing password does not ask for your old password, therefore running the command:will prompt you for your new password and will ask you to confirm it to make sure there is no typo.# passwd
That's it, you can now reboot your box and gain root access again
How to edit a file via ssh
To edit a file via ssh we have the following editors:

Suppose we want to edit a file /home/w3tools/index.html using vim editor.
To edit this file use the following steps:
1. Log in to server via ssh using any client (recommended: Putty)
2. Run the following commands.
4. To save the file Press Esc then wq .
Your file will be updated successfully.
If index.html doesn't exist it will be created automatically.
Note: To exit file editor without saving the file press Esc then q.
- nano / pico
- vim
- vi
- touch

Suppose we want to edit a file /home/w3tools/index.html using vim editor.
To edit this file use the following steps:
1. Log in to server via ssh using any client (recommended: Putty)
2. Run the following commands.
vim /home/w3tools/index.html3. Now the file index.html will be opened. To edit the file press i. Now make changes in the file.
4. To save the file Press Esc then wq .
Your file will be updated successfully.
If index.html doesn't exist it will be created automatically.
Note: To exit file editor without saving the file press Esc then q.
How to change root password via ssh.
To change the root password via ssh, use the following steps:
1. Log in to ssh by using any client(recommended: Putty).
2. Run these commands after it
DONE...!! YOUR PASSWORD FOR ROOT IS NOW UPDATED.
1. Log in to ssh by using any client(recommended: Putty).
2. Run these commands after it
su - root3. Enter your new password for root. Confirm your password by re-entering it.
passwd
DONE...!! YOUR PASSWORD FOR ROOT IS NOW UPDATED.
In
PHP,
php - lame mp3 script,
projects
//
//
Leave a Comment
PHP - lame encoder mp3 conversion
Uses PHP - lame to change ID3 tags and convert bitrate of a mp3 file.
You can change album,artist,trackno,genre,year,comment,artist,art and bitrate.
Link to lame encoder : Click here
Enjoy guys !
Source: TechnosLab
You can change album,artist,trackno,genre,year,comment,artist,art and bitrate.
Link to lame encoder : Click here
Enjoy guys !
Source: TechnosLab
In
blogger gdata guide,
PHP,
projects
//
//
Leave a Comment
How to add tags/labels to bloggers posts via Gdata api
Get The Code From Here: http://pastebin.com/8qCeJsNN
Dependency: http://framework.zend.com/download/gdata
Source: TechnosLab
Dependency: http://framework.zend.com/download/gdata
Source: TechnosLab
HTTP authentication via PHP
Here's a small snippet that let's you implement htaccess style http authentication in your PHP scripts. Just define user and password and you are ready to go !

Make sure that this code block is present in topmost of your scripts or it'll give errors and authentication will be messed up.

Go Here To download the code: http://pastebin.com/9Xu02jLD
Make sure that this code block is present in topmost of your scripts or it'll give errors and authentication will be messed up.
In
bypass,
leech,
tf,
timer,
torrent,
torrific,
torrific limit,
torrific.com,
tpb
//
//
Leave a Comment
Bypass torrific.com download timer
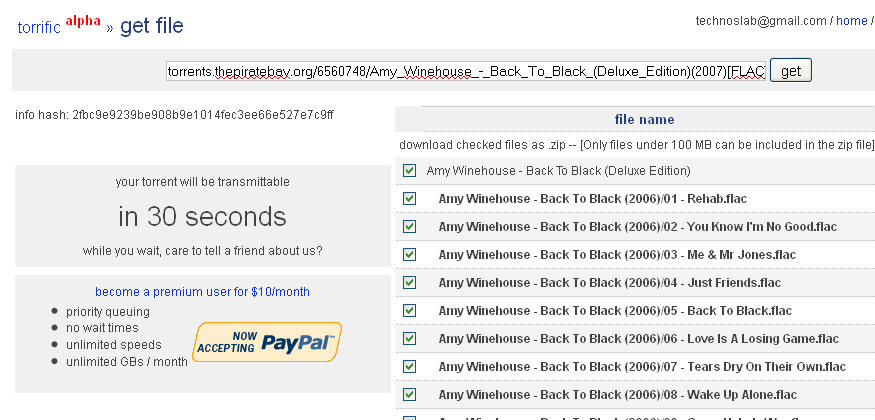
Torrific.com is a great tool for fetching torrents and downloading them over http through our favorite download manager. From last week, they have imposed a timer on download page that limits us from downloading a fetched torrent instantly. Now we can either pay them to gain premium access to their services or we can find a work around. While I suggest you to go for premium membership, I also give you a work around.
On the page where you are asked to wait for the download to begin, just put this in the browser's address bar and hit enter.
javascript:alert(DELAY_TIME=0);
and you would get the download link(s) immediately. Please note that Google chrome doesn't support javascript execution in address bar so it would not work for chrome users.
Source: TechnosLab
How to Change The Default SSH Port.
To force or change the default SSH to run on a non standard port, use the following steps:
1. Open /etc/ssh/sshd_config in your favorite text editor:
2. Look for the below lines:
3. Uncomment and edit this line to change the default port.
For example you can set it to:
4. Save the file, and restart the SSH.
NOTE: Removing the # will uncomment and you will need to remove this for any change in the port.
1. Open /etc/ssh/sshd_config in your favorite text editor:
2. Look for the below lines:
# Port 223. Uncomment and edit this line to change the default port.
For example you can set it to:
Port 994. Save the file, and restart the SSH.
/etc/init.d/ssh restartNOTE: Removing the # will uncomment and you will need to remove this for any change in the port.
In
node,
remove,
solusvm,
ssh
//
//
Leave a Comment
How to force remove a dead node from solusvm.
This command will help you in removing a dead node from solusvm master. Since the node is dead therefore we cannot remove it using the available option in the master.
Login to SSH in the master server and run below command.
The node id can be found in the VPS Control Panel. Click on node list and note down the ID of the node you want to remove.
Example: Suppose you want to remove a node having ID = 5
Then the command will be like:
Similarly you can force remove any node from the solusVM master. This will only remove the NODE from master and will not remove any physical VPS inside that node.
Login to SSH in the master server and run below command.
php /usr/local/solusvm/scripts/deletenode.php --level=force --comm=delete --id=The node id can be found in the VPS Control Panel. Click on node list and note down the ID of the node you want to remove.
Example: Suppose you want to remove a node having ID = 5
Then the command will be like:
php /usr/local/solusvm/scripts/deletenode.php --level=force --comm=delete --id=5Similarly you can force remove any node from the solusVM master. This will only remove the NODE from master and will not remove any physical VPS inside that node.


